I got the following error message on Firefox.
xxxxxx uses an invalid security certificate.
The certificate expired on 21/12/2010 11:59 AM.
(Error code: sec_error_expired_certificate)
I found from online sources that a very quick fix to this was to temporarily change the date on the computer. And I did just that. I changed the system date on my PC from 21 December 2010 to 21 November 2010.
Having done that I refreshed my Firefox and to my delight the error message was gone. I then switched back to the current date.
So that's a really quick and very effective way to fix the invalid security certificate error.
.:: Definition of blues from the Concise Oxford English Dictionary:
Informal feelings of melancholy, sadness and depression ::.
Friday, December 31, 2010
Monday, May 31, 2010
My Acer Aspire One Battery Will Not Charge - Problem Solved
I haven't touched my Acer Aspire One netbook for several months. A few days ago I tried to power it on but... nothing. The battery has obviously dischared by itself after being left idle for several months. So I hooked it up to the power socket and charged it overnight. To my surprise the next morning, my Acer Aspire One netbook still will not power on as the battery has not been charged.
The following evening I brought my netbook to the shop where I bought it and explained the problem to the shop owner there. He says the battery is damaged and need to be replaced. And it would cost RM200 to get a new battery. I gasped at the steep price. No way I'm spending that kind of money. So I went back home.
It was only a week later I started to do a search on the internet on my problem just to see if anyone else is facing the same thing and what solutions they have for it if any. What I found solved my problem. The solution is to update the BIOS of the Acer Aspire One netbook. It does sound scary to me at first the thought of updating the BIOS as I have never done it before. But I'm glad I did in the end as it worked. My Acer Aspire One battery can now charge again. Here the steps to update the BIOS as I found on the internet which I followed to the tee:
To perform the update to the BIOS:
1. To download the latest BIOS for the netbook, go to the Acer support website here.
2. Once at the Acer support website - Drivers & Download page, click Netbook -> Aspire One.
3. Select your product model which will be either AOA110 ot AOA150.
4. And then below, choose the "BIOS" tab.
5. Click the orange "Down" arrow to download the BIOS.
6. Insert a USB flash drive into a USB port on the netbook.
7. Open the .zip file you downloaded and extract the two files: "3310.fd" in the Dos_Flash folder and "Flashit.exe" onto the root directory of the USB flash drive
8. Rename the BIOS file from "3309.fd" to "zg5ia32.fd".
9. Ensure that the AC adapter is plugged in.
10. Press and hold down the Fn and the Esc keys together and press the power button.
11. The unit's power light will blink once.
12. Release both the Fn and Esc keys.
13. Your netbook screen will stay black for 1-2 minutes.
Don't worry as it will restart. If it doesn't after 3 minutes, then just un-plug the USB flash drive and plug it back in again and press power button
14. When the unit powers on, the BIOS will be updated from the USB flash drive
15. The battery should now be able to hold a charge from now on.
That's it! And you have just saved yourself RM200.
Note: These instructions are only for the Acer Aspire One AOA-110 and the AOA-150 netbook series and should not be performed on any other model.
Thursday, February 18, 2010
Alan Wilder Joined Martin On Stage For 'Somebody'
If you're a Depeche Mode fan then this will be big news: Alan Wilder joined Martin on stage for 'Somebody' at the Royal Albert Hall, London, February 17th 2010. He played the piano. He and Martin hugged after. He even hugged Fletch after. It was an unannounced thing and caught everyone by surprise. And what a nice surprise it was. Here are the videos of the historic moment:
Note: A high quality video will be up on Depeche Mode's official website in a couple of days time.
Note: A high quality video will be up on Depeche Mode's official website in a couple of days time.
Sunday, February 7, 2010
Solution To eBay's "Sorry, you've hit a speed bump!"
Just this morning I was trying to make an immediate payment to a seller for a Dvd I purchased today in eBay but hit the following cryptic message from eBay during payment processing: Sorry, you've hit a speed bump!

Tried several times throughout the morning to make the payment but every time I encountered that annoying useless message.
Finally, I found a workaround and successfully made the payment. Here is the method:
1) Logged in to your PayPal account
2) Click "Send Money"
3) Click "Pay for eBay Items"
4) At this point you will be asked to log on to your eBay account if you're not logged in yet. Log in to your eBay account.
5) You will be presented with a list of eBay items that you won.
6) Select the eBay items that you want to make payment for and then click on "Pay" button

That's it ! The payment will be successfully made.

Tried several times throughout the morning to make the payment but every time I encountered that annoying useless message.
Finally, I found a workaround and successfully made the payment. Here is the method:
1) Logged in to your PayPal account
2) Click "Send Money"
3) Click "Pay for eBay Items"
4) At this point you will be asked to log on to your eBay account if you're not logged in yet. Log in to your eBay account.
5) You will be presented with a list of eBay items that you won.
6) Select the eBay items that you want to make payment for and then click on "Pay" button

That's it ! The payment will be successfully made.
Wednesday, February 3, 2010
How To Download YouTube Videos
Here is a simple trick to download and view any videos from YouTube
As you probably know, by default, Youtube doesn't allow users to save/download its videos.
However, with the simple steps outlined below you will be able to save/download a YouTube video to your computer and later share it with your friends or keep it as a collection.
Steps to save/download videos from YouTube:-
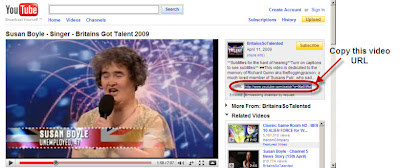
1) Highlight and copy the YouTube video URL that you see next to the video.
You can do this by clicking on the URL field (like below), right-click your mouse and select 'Copy'

2) Go to this website: http://keepvid.com/ and paste the video link that you copied from previous step in the field there (like below) and click 'Download' button next to the field.

3) Some download links will appear. Click the Download link for the quality you prefer.
4) Save as "video.flv" to your computer. (Note: You can replace "video" with any name you like, just override it)
That's it !
Congratulations! You have just learned a simple trick to download any YouTube Video you like and play it anytime you want. You don't have to worry about YouTube removing your fav video anymore.
If you think this tip is useful, spread the word !
As you probably know, by default, Youtube doesn't allow users to save/download its videos.
However, with the simple steps outlined below you will be able to save/download a YouTube video to your computer and later share it with your friends or keep it as a collection.
Steps to save/download videos from YouTube:-
1) Highlight and copy the YouTube video URL that you see next to the video.
You can do this by clicking on the URL field (like below), right-click your mouse and select 'Copy'

2) Go to this website: http://keepvid.com/ and paste the video link that you copied from previous step in the field there (like below) and click 'Download' button next to the field.

3) Some download links will appear. Click the Download link for the quality you prefer.
4) Save as "video.flv" to your computer. (Note: You can replace "video" with any name you like, just override it)
That's it !
Congratulations! You have just learned a simple trick to download any YouTube Video you like and play it anytime you want. You don't have to worry about YouTube removing your fav video anymore.
If you think this tip is useful, spread the word !
Friday, January 1, 2010
Can't See Adwords Ads In Firefox ... Solved
I recently noticed that my Firefox stopped displaying any Google Adwords ads in the Google search engine results pages or in any other pages actually. I started to think back to what I have just recently changed to my pc or Firefox that might have caused the problem. I hit a blank. Then I searched online for an answer to this problem.
I promptly found the answer within 2 minutes. I credited this page for the solution to the Adwords ads not showing in Firefox problem.

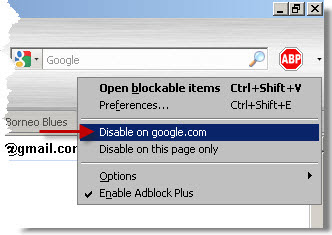
The Google Adwords ads not showing was due to the AdBlock Plus add-on which I installed recently. It was blocking the Adwords ads. According to the solution on that page, I'd need to find in the upper right corner of my Firefox browser a red stop sign with the initials ABP and then to click on the down arrow right beside the stop sign. After that to click on "Disable on google.com" which I followed. I refreshed the Google search results page next and there they are finally, the Google Adwords ads.
I promptly found the answer within 2 minutes. I credited this page for the solution to the Adwords ads not showing in Firefox problem.

The Google Adwords ads not showing was due to the AdBlock Plus add-on which I installed recently. It was blocking the Adwords ads. According to the solution on that page, I'd need to find in the upper right corner of my Firefox browser a red stop sign with the initials ABP and then to click on the down arrow right beside the stop sign. After that to click on "Disable on google.com" which I followed. I refreshed the Google search results page next and there they are finally, the Google Adwords ads.
Nokia 5800 Beeping During Calls ... Solved
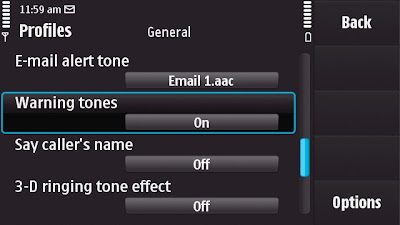
Recently my Nokia 5800 emits a series of very loud beeps when I was talking on the phone. A quick check on the internet for answers to this problem revealed that the profile setting in my phone, more specifically the Warning tones, need to be changed.
 So on my phone, I went to Settings > Personal > Profiles > General > Personalise. Then I set the Warning tones from 'On' to 'Off'.
I made a call after that to my family just to test and sure enough the loud beeps have gone.
Problem solved. Boy, was I relieved. Thought it might have been some bigger problem like some Nokia 5800 bugs that I heard so much about and which may be more troublesome to fix.
Subscribe to:
Comments (Atom)